
Automatically Delete iOS Simulator Screenshots
In iOS Development, you'll often use Command + S to take screenshots of your app running in the iOS Simulator. Although this is very convenient for sharing screenshots of your application with your team, or for pull requests, etc., since the system saves these screenshots to your Desktop, it quickly leads to a cluttered digital workspace.
In this article, we'll take a look at a quick script you can use that will automatically delete any Simulator screenshot that hasn't been opened or modified in the last 14 days.
Writing The Script
This approach relies on daemons - pronounced "demons"- which are effectively scripts that run autonomously in the background and are not under the control of a user or another application.
We'll return to the topic of daemons shortly, but let's write out the Python script first.
#!/usr/bin/python3

import os, time, shutil

two_weeks_ago = time.time() - (1 * 86400)
root = "/Users/aryamansharda/Desktop"

for i in os.listdir(root):
    path = os.path.join(root, i)

    if os.stat(path).st_mtime <= two_weeks_ago:
        if os.path.isfile(path) and ("Simulator Screen Shot" in path or "Simulator Screen Recording" in path):
            try:
                os.remove(path)

            except:
                print("Could not remove file:", i)
The script simply checks all of the files at the specified path and removes any that haven't been modified in over two weeks, provided the filename contains the phrase "Simulator Screen Shot" or "Simulator Screen Recording".
Configuring launchd
Now that the script is finished, let's set it up to run automatically.
MacOS's launchd framework allows us to create new daemons. If you're familiar with cron jobs, think of launchd as an equivalent on Mac.
Launchd is one of the first services or daemons as they are also known that launch when your Mac boots.
It’s a launch daemon that starts right after the kernel – the Unix core of macOS – and has a ProcessID (PID) of 0 or 1.
Its job is to load other daemons to load and run. It continues running in the background to make sure that services are still running, stops them if necessary, and launches any additional services that you need while you’re using your Mac. Your
Mac wouldn’t be able to run without it. And most of the time, it takes up very few resources.
MacPaw
In order to schedule a script with launchd, we need to create a .plist file which specifies the name of our process, the executable to launch, and at what frequency it should execute.
<?xml version="1.0" encoding="UTF-8"?>
<!DOCTYPE plist PUBLIC "-//Apple//DTD PLIST 1.0//EN" "http://www.apple.com/DTDs/PropertyList-1.0.dtd">
<plist version="1.0">
<dict>
    <key>Label</key>
    <string>com.AryamanSharda.SimulatorScreenshots</string>
    <key>RunAtLoad</key>
    <true/>
    <key>ProgramArguments</key>
    <array>
        <string>/usr/bin/python3</string>
    <string>/Users/aryamansharda/Documents/Personal/SimulatorScreenshots/RemoveOldScreenshots.py</string>
    </array>
    <key>StartCalendarInterval</key>
    <dict>
    	<key>Hour</key>
        <integer>18</integer>
        <key>Minute</key>
        <integer>15</integer>
        <key>Weekday</key>
        <integer>5</integer>
    </dict>
</dict>
</plist>
Label
This is the name of the job within launchd and must be unique for each job. As you've likely already noticed, the name is written in reverse domain notation much like bundle identifiers.
This should match the name of the .plist sans the extension.
RunAtLoad
Adding this key saves us the extra step of having to start the script after we've loaded it into the Terminal.
ProgramArguments
This is an array of strings that represent the tokenized arguments and the program to run. In this case, it will first invoke a Python shell and then run our script.
StartCalendarInterval
This allows us to specify a specific time and date to run our task. In this case, the script is configured to run at 6:15 pm every Friday. Both 0 and 7 are used to represent Sunday which means Monday is a 1 and so on.
StartInterval which would repeat a job every n seconds or RunAtLoad which would run the job the moment it's successfully loaded. To read more about the different configuration options, check out this resource.
Setting up the script
After creating the two files from the source code above, we'll just need to make a few small changes to our system permissions.
Start by changing the permissions of the .plist and the Python script:
sudo chown root:wheel RemoveOldScreenshots.py
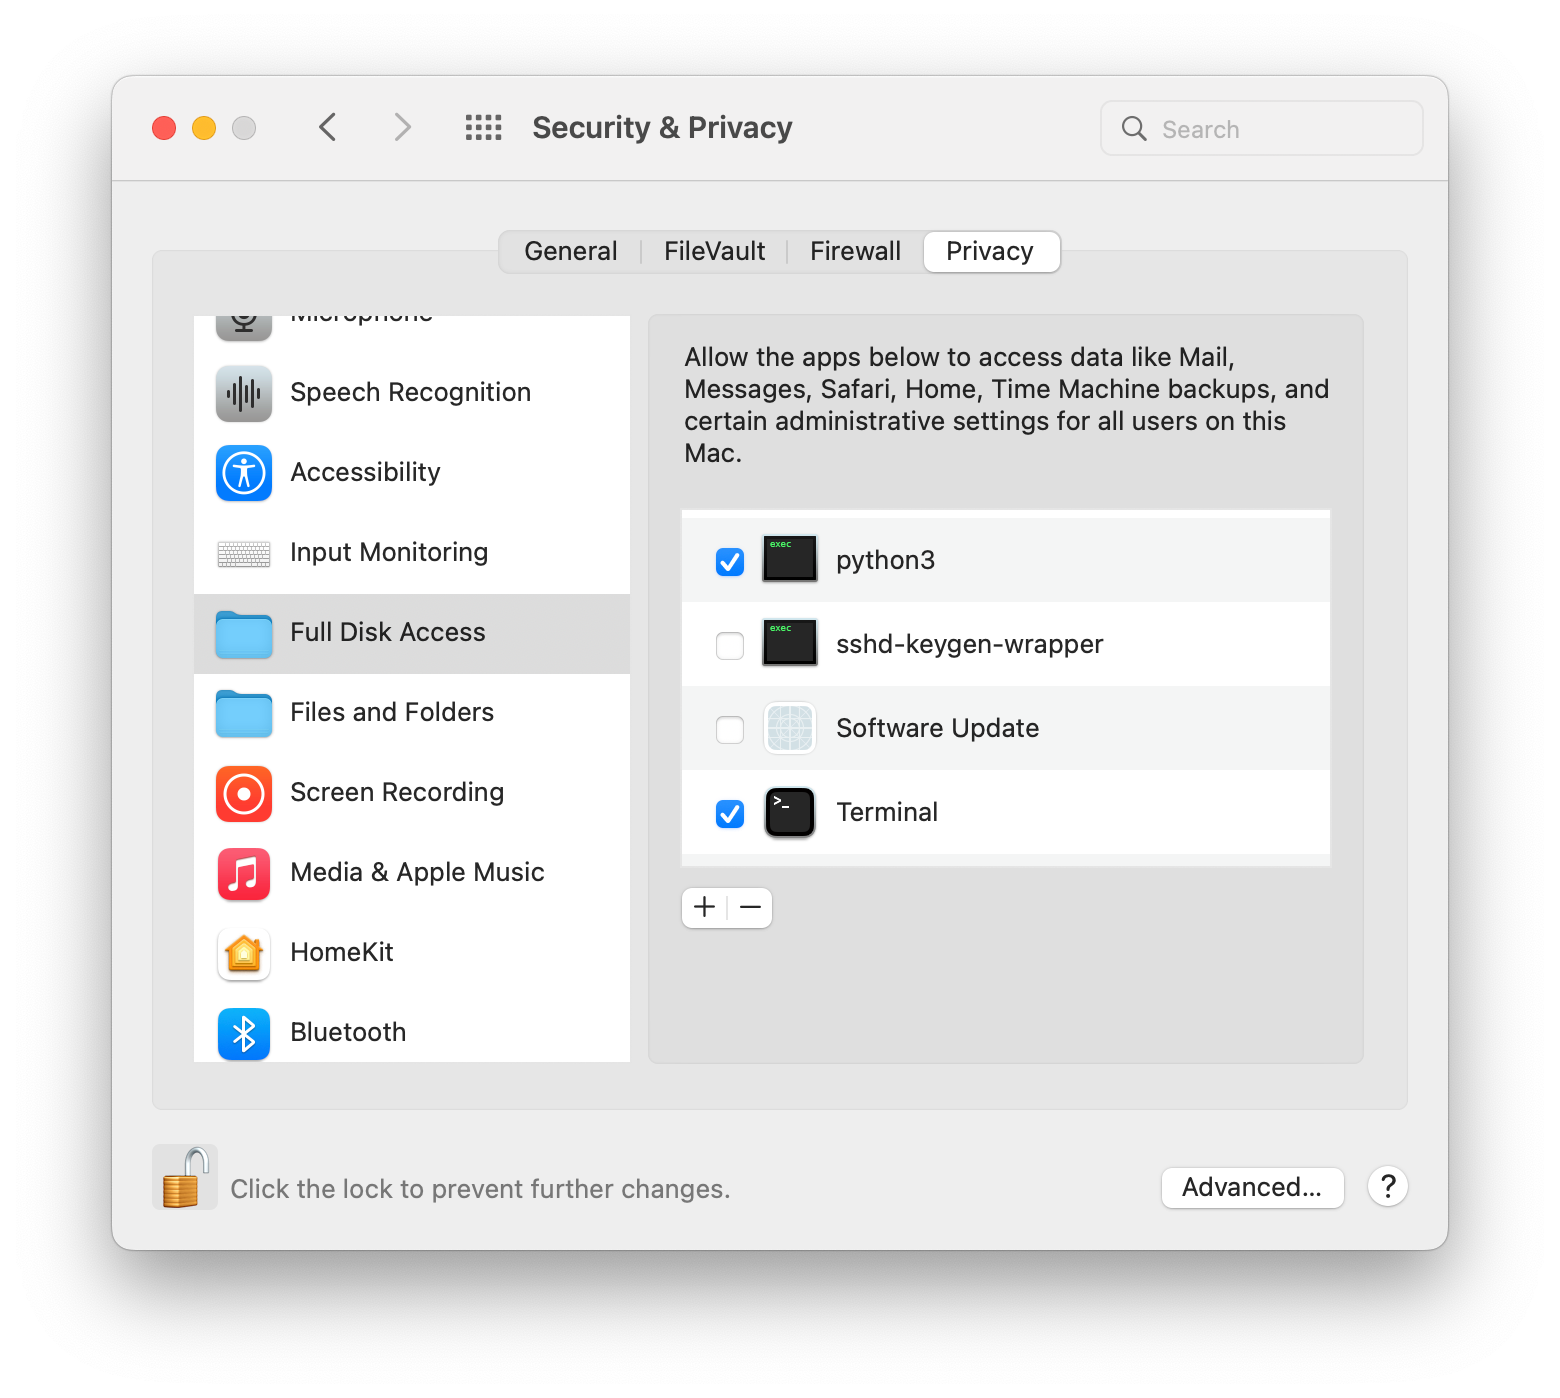
sudo chown root:wheel com.AryamanSharda.SimulatorScreenshots.plistIf you're curious about the wheel user group, you can read more about it here.Then, make sure that your Python installation and Terminal both have Full Disk Access so they're able to actually delete the files.
With everything configured, our final step is to load our new agent and start it!
In the Terminal, we'll need to find our user id:
id -u
502
Next, type in the following command and hit Enter.
# launchctl bootstrap gui/{USER_ID} {PATH_TO_PLIST}

launchctl bootstrap gui/502 /Users/aryamansharda/Documents/Personal/SimulatorScreenshots/com.AryamanSharda.SimulatorScreenshots.plist
This will automatically install, load, and run our script since we've specified RunAtLoad to true.
If you ever want to stop the script from executing, simply run:
launchctl bootout gui/502 /Users/aryamansharda/Documents/Personal/SimulatorScreenshots/com.AryamanSharda.SimulatorScreenshots.plistAnd that's a wrap! Now, our script is completely autonomous and will continue to run at whatever interval we've specified. Our Desktop will now stay neat and tidy without any manual intervention 😊.
If you're interested in more articles about iOS Development & Swift, check out my YouTube channel or follow me on Twitter.
If you're an indie iOS developer, make sure to check out my newsletter:


I feature a new developer every issue, so feel free to submit your indie iOS apps!
Do you have an iOS Interview coming up?
Check out my book Ace The iOS Interview!